When consolidating to multitenant, there are several consolidation patterns.
- Big, complex databases usually have special requirements for which it might be a good choice to go to single-tenant (a single PDB in one CDB)
- Small, relatively easy databases are the best candidate for consolidation to multitenant
- Schema consolidated databases require special attention, but in general there are several advantages to convert individual schemas (or group of schemas) to individual PDBs
For the latter, there are some techniques to convert a schema in a PDB.
- export/import (obviously), with eventually Golden Gate to do it online
- Transportable tablespaces (if the schemas follow strict 1-to-1 tablespace separation
- partial PDB cloning
We will focus on the last one for this blog post.
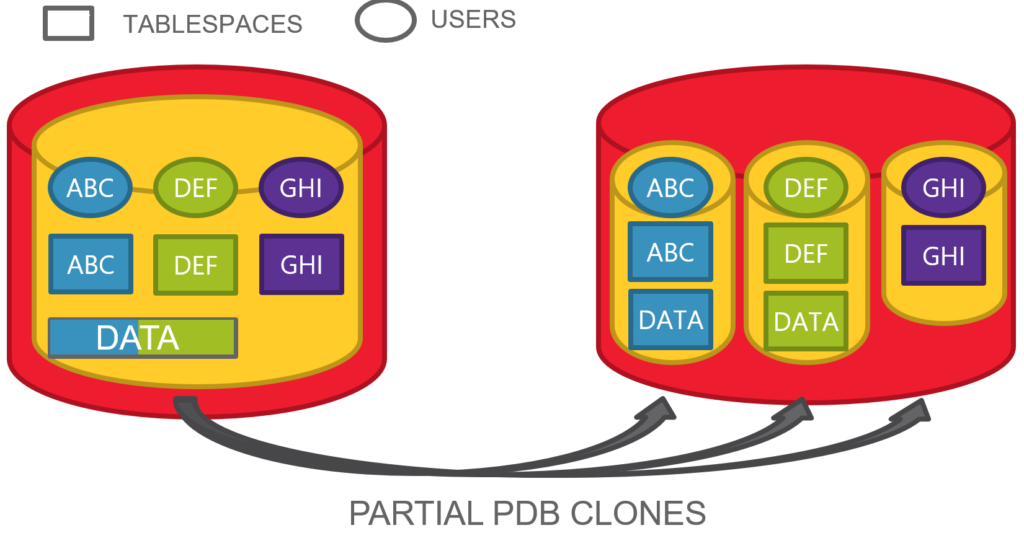
Situation
![]()
Here we have a PDB with some schemas, each of them has a dedicated tablespace, but accidentally, two of them have also some objects on a common tablespace.
This happens frequently when all the users have quota on the default database tablespace and they do not have necessarily a personal default tablespace.
connect / as sysdba
CREATE PLUGGABLE DATABASE PDB1 ADMIN USER pdbadmin IDENTIFIED BY manager;
ALTER PLUGGABLE DATABASE PDB1OPEN;
ALTER SESSION SET CONTAINER=PDB1;
CREATE TABLESPACE ABC DATAFILE SIZE 50M;
CREATE TABLESPACE DEF DATAFILE SIZE 50M;
CREATE TABLESPACE GHI DATAFILE SIZE 50M;
CREATE USER ABC IDENTIFIED BY ABC DEFAULT TABLESPACE ABC QUOTA UNLIMITED ON ABC;
CREATE USER DEF IDENTIFIED BY DEF DEFAULT TABLESPACE DEF QUOTA UNLIMITED ON DEF;
CREATE USER GHI IDENTIFIED BY GHI DEFAULT TABLESPACE GHI QUOTA UNLIMITED ON GHI;
ALTER USER ABC QUOTA UNLIMITED ON DATA;
ALTER USER DEF QUOTA UNLIMITED ON DATA;
ALTER USER GHI QUOTA UNLIMITED ON DATA;
GRANT CREATE SESSION, ALTER SESSION, CREATE TABLE TO ABC, DEF, GHI;
CONNECT abc/abc@srcsrv:1521/pdb1
CREATE TABLE T1 (A VARCHAR2(50));
INSERT INTO T1 VALUES ('TOTO');
COMMIT;
CREATE TABLE T2 (A VARCHAR2(50)) TABLESPACE DATA;
INSERT INTO T2 VALUES ('TOTO');
COMMIT;
CONNECT def/def@srcsrv:1521/pdb1
CREATE TABLE T1 (A VARCHAR2(50));
INSERT INTO T1 VALUES ('TOTO');
COMMIT;
CREATE TABLE T2 (A VARCHAR2(50)) TABLESPACE DATA;
INSERT INTO T2 VALUES ('TOTO');
COMMIT;
CONNECT ghi/ghi@srcsrv:1521/pdb1
CREATE TABLE T1 (A VARCHAR2(50));
INSERT INTO T1 VALUES ('TOTO');
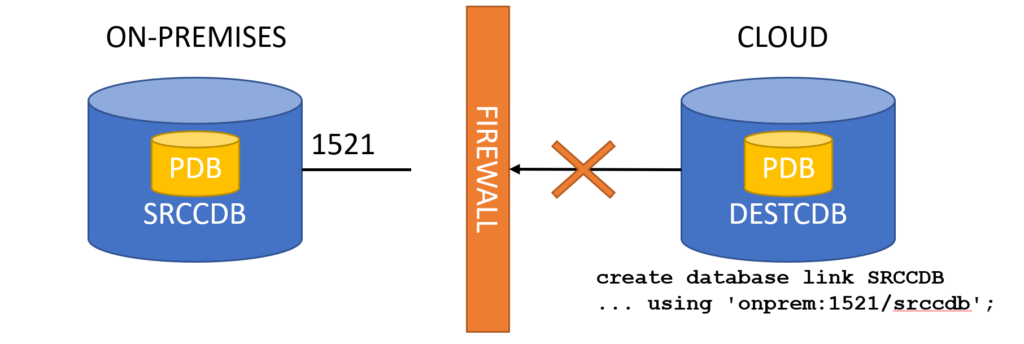
COMMIT;This is the typical situation where transportable tablespaces become hard to achieve without some upfront segment movement, as tablespaces are not self-contained.
Thankfully, Oracle Multitenant allows us to clone a PDB from a remote one and specify only a subset of tablespaces.
CREATE PLUGGABLE DATABASE ABC FROM PDB1.ORCL1_PDB1_tempclone
  USER_TABLESPACES=('ABC','DATA');
Here is a full example script with some checks and fancy parameters:
--------------------------
-- Script: clone_pdb.sql
-- Purpose: (partial) clone a PDB from remote PDB
-- Author: Ludovico Caldara (Trivadis)
--
-- Execute as: DBA in CDB$ROOT
--
-- Requirements: The remote user for the DBlink must have SELECT privileges on a few fixed views:
-- --
-- create user c##remote_user identified by manager container=all;
-- grant create session, sysoper, create pluggable database to c##remote_user container=all;
-- -- granting extra privileges to get file names and total size
-- grant select on sys.v_$pdbs to c##remote_user container=all;
-- grant select on sys.v_$datafile to c##remote_user container=all;
-- grant select on sys.v_$database to c##remote_user container=all;
-- alter user c##remote_user set container_data=all for v_$pdbs container=current;
-- alter user c##remote_user set container_data=all for v_$datafile container=current;
-- alter user c##remote_user set container_data=all for v_$database container=current;
--
--
--
-- Script variables:
define SourceCDB = 'ORCL1'
define SourcePDB = 'PDB1'
define SourceUser = 'C##REMOTE_USER'
define SourcePassword = 'manager'
define SourceAlias = 'srcsrv:1521/PDB1'
define TargetCDB = 'ORCL2'
define TargetPDB = 'ABC'
define UserTBSPClause = 'USER_TABLESPACES=(''ABC'',''DATA'')'
-- in case of non-OMF
define FileNameConvertClause = 'FILE_NAME_CONVERT=(''/&SourceCDB/&SourcePDB/'',''/&TargetCDB/&TargetPDB/'')'
SET ECHO ON SERVEROUTPUT ON
-- Temporary database link name. We try to drop it if it exists but nevermind if it gives error
WHENEVER SQLERROR CONTINUE
DROP DATABASE LINK &SourceCDB._&SourcePDB._tempclone;
-- The other tasks shouls succeed, otherwise exit
WHENEVER SQLERROR EXIT 1
CREATE DATABASE LINK &SourceCDB._&SourcePDB._tempclone connect to &SourceUser identified by &SourcePassword using '&SourceAlias';
-- in this PL/SQL block we make sure that we do not copy if
-- the source is NOARCHIVELOG or not LOCAL UNDO and PDB is not READ ONLY
DECLARE
l_log_mode sys.v_$database.log_mode%TYPE;
l_local_undo database_properties.property_value%TYPE;
l_open_mode sys.v_$pdbs.open_mode%TYPE;
BEGIN
BEGIN
SELECT open_mode INTO l_open_mode FROM sys.v_$pdbs@&SourceCDB._&SourcePDB._tempclone WHERE name='&SourcePDB';
EXCEPTION
WHEN no_data_found THEN raise_application_error(-20104,'Pluggable database not found.');
END;
-- Check if NOARCHIVELOG and not READ ONLY
SELECT log_mode INTO l_log_mode FROM sys.v_$database@&SourceCDB._&SourcePDB._tempclone ;
IF l_log_mode = 'NOARCHIVELOG' AND l_open_mode <> 'READ ONLY' THEN
raise_application_error(-20102,'The database is in NOARCHIVELOG mode and the PDB is not READ ONLY.');
END IF;
-- Check if not LOCAL_UNDO_ENABLED and not READ ONLY
SELECT property_value INTO l_local_undo FROM database_properties@&SourceCDB._&SourcePDB._tempclone WHERE property_name = 'LOCAL_UNDO_ENABLED';
IF l_local_undo <> 'TRUE' AND l_open_mode <> 'READ ONLY' THEN
raise_application_error(-20103,'The LOCAL UNDO is not enabled for the database and the PDB is not READ ONLY.');
END IF;
END;
/
-- let's add some intelligence... Parallel degree depending on PDB size
COLUMN parallel new_value parallel
SELECT CASE
WHEN ROUND(total_size/POWER(1024,3)) <= 1 THEN 1
WHEN ROUND(total_size/POWER(1024,3)) >= 5 THEN 4
ELSE 2 END AS parallel
FROM sys.v_$pdbs@&SourceCDB._&SourcePDB._tempclone WHERE NAME='&SourcePDB';
-- Real clone PDB
CREATE PLUGGABLE DATABASE &TargetPDB FROM &SourcePDB.@&SourceCDB._&SourcePDB._tempclone &UserTBSPClause PARALLEL ¶llel &FileNameConvertClause;
ALTER PLUGGABLE DATABASE &TargetPDB OPEN;
ALTER PLUGGABLE DATABASE &TargetPDB SAVE STATE;
-- drop temporary db link: leaving it there exposes some risks
DROP DATABASE LINK &SourcePDB.@&SourceCDB._&SourcePDB._tempclone
SET ECHO OFF SERVEROUTPUT OFFThis is an example output:
SQL> @/tmp/clone
SQL>
SQL> -- Temporary database link name. We try to drop it if it exists but nevermind if it gives error
SQL> WHENEVER SQLERROR CONTINUE
SQL> DROP DATABASE LINK &SourceCDB._&SourcePDB._tempclone;
old 1: DROP DATABASE LINK &SourceCDB._&SourcePDB._tempclone
new 1: DROP DATABASE LINK ORCL1_PDB1_tempclone
Database link dropped.
SQL>
SQL> -- The other tasks shouls succeed, otherwise exit
SQL> WHENEVER SQLERROR EXIT 1
SQL> CREATE DATABASE LINK &SourceCDB._&SourcePDB._tempclone connect to &SourceUser identified by &SourcePassword using '&SourceAlias';
old 1: CREATE DATABASE LINK &SourceCDB._&SourcePDB._tempclone connect to &SourceUser identified by &SourcePassword using '&SourceAlias'
new 1: CREATE DATABASE LINK ORCL1_PDB1_tempclone connect to C##REMOTE_USER identified by manager using 'srcsrv:1521/PDB1'
Database link created.
SQL>
SQL> -- in this PL/SQL block we make sure that we do not copy if
SQL> -- the source is NOARCHIVELOG or not LOCAL UNDO and PDB is not READ ONLY
SQL> DECLARE
2 l_log_mode sys.v_$database.log_mode%TYPE;
3 l_local_undo database_properties.property_value%TYPE;
4 l_open_mode sys.v_$pdbs.open_mode%TYPE;
5
6 BEGIN
7 BEGIN
8 SELECT open_mode INTO l_open_mode FROM sys.v_$pdbs@&SourceCDB._&SourcePDB._tempclone WHERE name='&SourcePDB';
9 EXCEPTION
10 WHEN no_data_found THEN raise_application_error(-20104,'Pluggable database not found.');
11 END;
12
13 -- Check if NOARCHIVELOG and not READ ONLY
14 SELECT log_mode INTO l_log_mode FROM sys.v_$database@&SourceCDB._&SourcePDB._tempclone ;
15 IF l_log_mode = 'NOARCHIVELOG' AND l_open_mode <> 'READ ONLY' THEN
16 raise_application_error(-20102,'The database is in NOARCHIVELOG mode and the PDB is not READ ONLY.');
17 END IF;
18
19 -- Check if not LOCAL_UNDO_ENABLED and not READ ONLY
20 SELECT property_value INTO l_local_undo FROM database_properties@&SourceCDB._&SourcePDB._tempclone WHERE property_name = 'LOCAL_UNDO_ENABLED';
21 IF l_local_undo <> 'TRUE' AND l_open_mode <> 'READ ONLY' THEN
22 raise_application_error(-20103,'The LOCAL UNDO is not enabled for the database and the PDB is not READ ONLY.');
23 END IF;
24 END;
25 /
old 8: SELECT open_mode INTO l_open_mode FROM sys.v_$pdbs@&SourceCDB._&SourcePDB._tempclone WHERE name='&SourcePDB';
new 8: SELECT open_mode INTO l_open_mode FROM sys.v_$pdbs@ORCL1_PDB1_tempclone WHERE name='PDB1';
old 14: SELECT log_mode INTO l_log_mode FROM sys.v_$database@&SourceCDB._&SourcePDB._tempclone ;
new 14: SELECT log_mode INTO l_log_mode FROM sys.v_$database@ORCL1_PDB1_tempclone ;
old 20: SELECT property_value INTO l_local_undo FROM database_properties@&SourceCDB._&SourcePDB._tempclone WHERE property_name = 'LOCAL_UNDO_ENABLED';
new 20: SELECT property_value INTO l_local_undo FROM database_properties@ORCL1_PDB1_tempclone WHERE property_name = 'LOCAL_UNDO_ENABLED';
PL/SQL procedure successfully completed.
SQL>
SQL> -- let's add some intelligence... Parallel degree depending on PDB size
SQL> COLUMN parallel new_value parallel
SQL> SELECT CASE
2 WHEN ROUND(total_size/POWER(1024,3)) <= 1 THEN 1
3 WHEN ROUND(total_size/POWER(1024,3)) >= 5 THEN 4
4 ELSE 2 END AS parallel
5 FROM sys.v_$pdbs@&SourceCDB._&SourcePDB._tempclone WHERE NAME='&SourcePDB';
old 5: FROM sys.v_$pdbs@&SourceCDB._&SourcePDB._tempclone WHERE NAME='&SourcePDB'
new 5: FROM sys.v_$pdbs@ORCL1_PDB1_tempclone WHERE NAME='PDB1'
PARALLEL
----------
2
SQL>
SQL> -- Real clone PDB
SQL> CREATE PLUGGABLE DATABASE &TargetPDB FROM &SourcePDB.@&SourceCDB._&SourcePDB._tempclone &UserTBSPClause PARALLEL ¶llel &FileNameConvertClause;
old 1: CREATE PLUGGABLE DATABASE &TargetPDB FROM &SourcePDB.@&SourceCDB._&SourcePDB._tempclone &UserTBSPClause PARALLEL ¶llel &FileNameConvertClause
new 1: CREATE PLUGGABLE DATABASE ABC FROM PDB1@ORCL1_PDB1_tempclone USER_TABLESPACES=('ABC','DATA') PARALLEL 2 FILE_NAME_CONVERT=('/ORCL1/PDB1/','/ORCL2/ABC/')
Pluggable database created.
SQL> ALTER PLUGGABLE DATABASE &TargetPDB OPEN;
old 1: ALTER PLUGGABLE DATABASE &TargetPDB OPEN;
new 1: ALTER PLUGGABLE DATABASE ABC OPEN;
Pluggable database altered.
SQL>ALTER PLUGGABLE DATABASE &TargetPDB SAVE STATE;
old 1: ALTER PLUGGABLE DATABASE &TargetPDB SAVE STATE;
new 1: ALTER PLUGGABLE DATABASE ABC SAVE STATE;
Pluggable database altered.
SQL>
SQL> -- drop temporary db link: leaving it there exposes some risks
SQL> DROP DATABASE LINK &SourcePDB.@&SourceCDB._&SourcePDB._tempclone
2
SQL> SET ECHO OFF SERVEROUTPUT OFFIf the clone process succeeds, at the end we should have the new ABC pluggable database with ABC and DATA tablespaces only.
SQL> select tablespace_name from dba_tablespaces;

TABLESPACE_NAME
------------------------------
SYSTEM
SYSAUX
UNDOTBS1
TEMP
DATA
ABC
Yeah!
Any Cleanup needed?
What happened to the users? Actually, they are all still there:
SQL> select username from dba_users where oracle_maintained='N';

USERNAME
--------------------------------------------------------------------------------
PDBADMIN
C##REMOTE_CLONE
ABC
DEF
GHI

5 rows selected.
And the segments in the two skipped tablespaces are not there:
SQL> select owner, segment_name, tablespace_name from dba_segments
2> where owner in ('ABC','DEF','GHI');

OWNER                SEGMENT_NAME         TABLESPACE_NAME
-------------------- -------------------- ------------------------------
ABC                  T2                   DATA
DEF                  T2                   DATA
ABC                  T1                   ABC
So the table definitions are also gone?
SQL> select owner, table_name, tablespace_name from dba_tables
  2    where owner in ('ABC','DEF','GHI');

OWNER                TABLE_NAME           TABLESPACE_NAME
-------------------- -------------------- ------------------------------
ABC                  T2                   DATA
ABC                  T1                   ABC
DEF                  T2                   DATA
DEF                  T1                   DEF
GHI                  T1                   GHI
Not at all! The tables are still there and reference to tablespaces that do not exist anymore. Possible?
Actually, the tablespaces definition are still there if we look at v$tablespace:
SQL> select name from v$tablespace;

NAME
------------------------------
SYSTEM
SYSAUX
UNDOTBS1
TEMP
DATA
ABC
DEF
GHI

8 rows selected.
If we give a look at the DBA_TABLESPACES view definition, there are a few interesting filters:
create or replace view DBA_TABLESPACES
...
where ts.online$ != 3
and bitand(flags,2048) != 2048
and bitand(ts.flags, 16777216) != 16777216
...
/
What is their meaning?
online$     /* status (see KTT.H): */
             /* 1 = ONLINE, 2 = OFFLINE, 3 = INVALID */

  flags      /* various flags: see ktt3.h */
             /* 0x800 = this actually describes a group */ -- 2048
             /* 0x1000000 = bad transport of ts in pdb */ -- 16777216
So the first WHERE clause skips all the INVALID TABLESPACES (when you drop a tablespace it is still stored in ts$ with this state), the second skips the definition of TEMPORARY TABLESPACE GROUPS, the third one is actually our candidate.
Indeed, this is what we get from ts$ for these tablespaces:
SQL> select name, decode(online$,1,'ONLINE',2,'OFFLINE',3,'INVALID',4,'READ ONLY','UNDEFINED') as STATUS, bitand(flags,2048), bitand(flags,16777216) from ts$;

NAME                           STATUS    BITAND(FLAGS,2048) BITAND(FLAGS,16777216)
------------------------------ --------- ------------------ ----------------------
SYSTEM                         ONLINE                     0                      0
SYSAUX                         ONLINE                     0                      0
UNDOTBS1                       ONLINE                     0                      0
TEMP                           ONLINE                     0                      0
DATA                           ONLINE                     0                      0
ABC                            ONLINE                     0                      0
DEF                            OFFLINE                    0               16777216
GHI                            OFFLINE                    0               16777216

8 rows selected.
So the two tablespaces are filtered out because of this new multitenant flag.
If we try to drop the tablespaces, it succeeds:
SQL> drop tablespace def including contents and datafiles;

Tablespace dropped.

SQL> drop tablespace ghi including contents and datafiles;

Tablespace dropped.
But the user GHI, who has no objects anymore, is still there.
SQL> select username from dba_users
  2  where username  in ('ABC','DEF','GHI') ;

USERNAME
-------------------------
GHI
DEF
ABC
So we need to drop it explicitly.
SQL> drop user ghi cascade;

User dropped.

SQL>
Automate the cleanup
This is an example PL/SQL that is aimed to automate the cleanup.
Actually:
- Users that had segments in one of the excluded tablespaces but do not have any segments left are just LOCKED (for security reasons, you can guess why).
- Tablespaces that meet the “excluded PDB” criteria, are just dropped
set serveroutput on
DECLARE

        -- get the users that had tables in the non-cloned TBSP that do not have any other segments...
        CURSOR c_users IS
                SELECT DISTINCT owner as username FROM dba_tables t
                WHERE t.tablespace_name IN (
                        SELECT name FROM sys.ts$ WHERE online$=2 AND bitand(flags, 16777216)=16777216
                ) AND NOT EXISTS (
                        SELECT 1 FROM dba_segments s WHERE s.owner=t.owner
                );

        -- get the list of non-cloned TBSP
        CURSOR c_tbsps IS
                SELECT name FROM sys.ts$ WHERE online$=2 AND bitand(flags, 16777216)=16777216;

        r_users c_users%ROWTYPE;
        r_tbsps c_tbsps%ROWTYPE;

        e_drop_def_tbsp EXCEPTION;
        PRAGMA EXCEPTION_INIT (e_drop_def_tbsp, -12919);


BEGIN
        -- check if currently in a PDB
        IF sys_context('userenv','con_name') = 'CDB$ROOT' THEN
                raise_application_error(-20101,'The current container is CDB$ROOT. It must be a PDB.');
        END IF;

        -- loop all candidate users and lock them out
        OPEN c_users;
        LOOP
                        FETCH  c_users  INTO r_users;
                        EXIT WHEN c_users%NOTFOUND;
                        dbms_output.put_line ('ALTER USER '||r_users.username||' ACCOUNT LOCK');
                        execute immediate 'ALTER USER '||r_users.username||' ACCOUNT LOCK';
                        dbms_output.put_line ('User '||r_users.username||' locked.');
        END LOOP;

        -- loop all candidate tbsps and drop them
        OPEN c_tbsps;
        LOOP
                FETCH  c_tbsps  INTO r_tbsps;
                EXIT WHEN c_tbsps%NOTFOUND;
                dbms_output.put_line ('DROP TABLESPACE '||r_tbsps.name||' INCLUDING CONTENTS AND DATAFILES');
                BEGIN
                        execute immediate 'DROP TABLESPACE '||r_tbsps.name||' INCLUDING CONTENTS AND DATAFILES';
                        dbms_output.put_line ('Tablespace '||r_tbsps.name||' dropped.');
                EXCEPTION
                        WHEN e_drop_def_tbsp THEN
                                dbms_output.put_line ('Cannot drop default tablespace '||r_tbsps.name||'. Please change the default tablespace and drop it afterwards.');
                END;
        END LOOP;
END;
/
This is the output for the clone procedure we have just seen:
SQL> @cleanup_partial_pdb.sql
ALTER USER GHI ACCOUNT LOCK
User GHI locked.
DROP TABLESPACE DEF INCLUDING CONTENTS AND DATAFILES
Tablespace DEF dropped.
DROP TABLESPACE GHI INCLUDING CONTENTS AND DATAFILES
Tablespace GHI dropped.

PL/SQL procedure successfully completed.
The PL/SQL block can be quite slow depending on the segments and tablespaces, so it might be a good idea to have a custom script instead of this automated one.
What about user DEF?
The automated procedure has not locked the account DEF. Why?
Actually, the user DEF still has some segments in the DATA tablespace. Hence, the procedure cannot be sure what was the original intention: copy the user ABC ? The clone procedure allows only to specify the tablespaces, so this is the only possible result.
Promo: If you need to migrate to Multitenant and you need consulting/training, just contact me, I can help you ![🙂]()
 )
) (including version, edition, exit code, etc)